This blog post explains an approach to generate a dynamic ETL process for Apache Airflow, by using Jinja2 templates and relational stored metadata.
tl;dr
Airflow uses DAGs (Directed Acyclic Graph) to orchestrate workflows. A DAG consists of a sequence of tasks, which can be implemented to perform the extract, transform and load processes. Instead of utilizing Airflow’s internal features to generate the ETL process, a custom solution is implemented to gain more flexibility.
Jinja2 templates are used for the fixed code parts. Task dependencies are derived from relational data dependencies. The Jinja2 templates and all ETL intrinsic dependencies are stored in a PostgreSQL database.
The ETL process is generated by a fixed DAG, which holds the program logic as plain Python code. It loads all metadata, puts everything in it’s place and writes the result as DAG files.
Disclaimer
The described implementation is a prototype, which is meant as a proof of concept (POC). Currently it’s not used in a production environment.
The general idea to create a file for each DAG is stolen from this article: https://www.astronomer.io/guides/dynamically-generating-dags
Introduction
Imagine managing an existing Data Warehouse (DWH), while most of your team members are SQL experts. The existing ETL process is mainly a sequence of stored procedures, written in plain SQL. Now the challenge is to find a efficient way to implement, deploy and schedule the ETL process.
As most of the tasks are very similar, the obvious idea is to generate the ETL process dynamically. Then you don’t have to implement the same type of task over and over again. This means saving time and avoiding bugs by writing less code. Since your team is data centric, it makes sense to choose a (meta-)data driven implementation.
For this prototype, the orchestration of the ETL process is done by Apache Airflow. Each stored procedure call becomes a single task. This tasks are wrapped into a DAG. Every information to generate DAGs, tasks and all kinds of dependencies is stored in a PostgreSQL database.
Setup
If you want to setup the example application, please follow the steps below.
Find out how to run the application in the Usage chapter.
Docker:
Setup Docker and Docker compose on your machine
Clone prototype repo:
git clone https://github.com/silpion/airflow-dag-generator.gitPostgreSQL:
cd airflow-dag-generator && cd postgres && ./start_postgres.sh
Airflow:
See: https://airflow.apache.org/docs/apache-airflow/stable/start/docker.html
Hint: To get rid of the DAG examples, change AIRFLOW__CORE__LOAD_EXAMPLES to false in docker-compose.yaml.
Copy airflow/dags/generator.py to Airflow’s dags folder.
To setup the database connections in Airflow, first open the webui http://localhost:8080,
then head for menu Admin/Connections and add
dwh_pg:
Conn Id: dwh_pg, Conn type: Postgres, Host: your local ip, like 192.168.178.10, Schema: dwh,
login: root, password: poc_af_123##, Port: 5433
etl_pg:
Conn Id: etl_pg, Conn type: Postgres, Host: your local ip, like 192.168.178.10, Schema: etl,
login: root, password: poc_af_123##, Port: 5433
Design decisions
The central component of the prototype is a Python program (a DAG), which generates other DAGs from templates and dynamic values. Template and values are stored in the PostgreSQL instance. The generated DAGs are deployed as Python files in Airflows’s dags folder.
A more ‚airflowic‘ way would be to create in memory DAGs by using Airflow functionallity.
The reasons for not doing it like that are:
- It’s easier to debug physical files than in memory code
- It’s more flexible, because there’s no limitation by Airflow’s functional range
- Improved scalability (because the DAGs are not created at runtime)
- It’s possible to migrate to other code based workflow schedulers,
because no Airflow specific code is used to generate the DAGs
Why you should consider to store the metadata in the DWH database instead of using text files?
- Dependencies, like tasks to DAG, or template to task, can be seamlessly mapped to relational data structure.
Especially the task’s graph dependencies of the DAGs can be idiomatically defined by relational dependencies. - Data affinity of the team members
- Everything can be changed on the fly with SQL updates in development for
trying stuff while implementing or for debugging reasons. - ETL deployment can be easily integrated in an existing database deployment. (e.g. plain text SQL files deployment with Redgate flyway)
Implementation
The ETL process implemented as example is very basic. It only consists of a DAG named load_sale_star. A DAG is one of Airflow’s key concepts. In general it’s Python code, which wraps tasks and their relationships. To implement a task, you can choose between different operators (See: Airflow operators).
The example below shows the Postgres Operator used in the generated DAG load_sale_star.
with DAG (
   dag_id="ETL",
   start_date=datetime.datetime(2020, 2, 2),
   schedule_interval='59 23 * * *',
   catchup=False,
) as dag:
   dim_customer = PostgresOperator(
      task_id='load_dim_customer',
      postgres_conn_id='dwh_pg',
      sql='CALL load.sp_dim_customer();',
      autocommit = True,
)
The purpose of the Postges Operator is to execute SQL statements on PostgreSQL databases.
In the present case this is just an execution of a stored procedure.
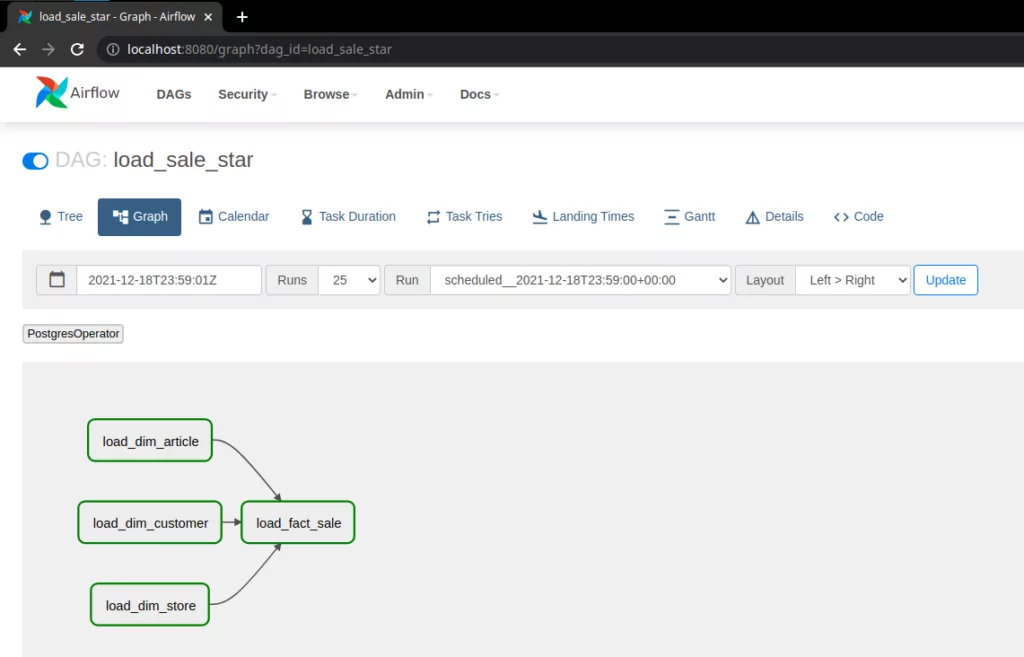
This screenshot taken from Airflow’s webui shows the dependencies between the tasks of the load_sale_star DAG.

As the task’s relationships are in a graph structure, every task is a node and the node’s dependencies are edges. The direction of the edges defines the node’s processing order.
Overall there are three pieces of a DAG that have to be generated. The code of the DAG itself, the tasks and the task’s dependencies. The generation process is done by a specific DAG named generator. It mainly consists of an implemented Python Operator.
As mentioned in the chapter Design decisions, the blueprint of the ETL Process is stored in a database. So let’s have a look at the PostgreSQL instance. Beside the metadata it contains the exemplary business data.
Database:
- etl: ETL related metadata
- stage: Staging area with business data
- dwh: Simple DWH including a star scheme
The business data of the stage database is pretty straightforward. There is some exemplary sales data, which will be transfered to the sales star scheme of the dwh database. This is done by the generated load_sale_star DAG.
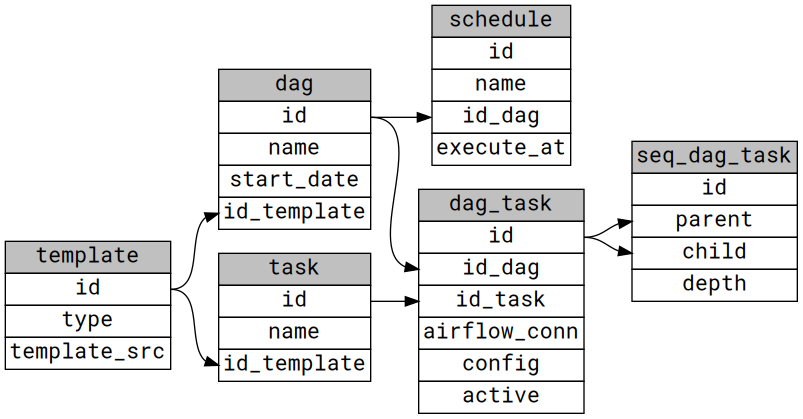
All components of the ETL process are stored in the tables of the etl database. The graphic data model points out all dependencies and eminent columns.

The DAGs (table: dag) refers to a Jinja2 (See: Jinja2 documentation) template stored in the table template. Alike the DAGs every task (table: task) has a reference to a template, too. The mappings from tasks to a DAG are content of the dag_task table.
The relationships between the tasks are stored in the table seq_dag_task. The (foreign-) key columns are seq_dag_task.parent and seq_dag_task.child. As their names reveal, the child column contains the descendant’s dag_task.id, while the parent column is holding the ancestor’s dag_task.id.
This makes it easy to define all possible connections between the tasks.
The DAG template below shows how DAG, task and dependency code are getting connected. The second snippet is the template of a single task.
# imports omitted here
with DAG( dag_id="{{dag_id}}",
  start_date=datetime.datetime{{start_date}},
  schedule_interval="{{schedule_interval}}",
  catchup=False,
) as dag:
  {% for task in tasks %}
  {{task}} {% endfor %}
  {% for dependency in dependencies %}
  {{dependency}} <br> {% endfor %}
To render the DAG the following dictionary is passed to the rendering function:
dag_data = {
 'dag_id': dag['dag_name'],
 'start_date': dag['dag_start_date'],
 'tasks': [], 'dependencies: [],
}
As you can see here, this dictionary contains the empty lists tasks and dependencies.
The content of dependencies is generated with the data from the seq_dag_task table. One item of the list is just a concatenation of a parent task, the bitshift operator ‚>>‘ and a child task, like ‚load_dim_customer >> load_fact_sale‘. This is one of the possible notations for task dependencies in Airflow.
The list tasks is filled with rendered task templates, which are working Python snippets of each task. The raw task template below is rendered with the values of the followed task_data dictionary.
{{task_id}} = PostgresOperator(
        task_id="{{task_id}}',
        postgres_conn_id="{{task_conn}}',
        sql="{{cmd}}',
        autocommit = True,

task_data = {
    'task_id': task['task_name'],
    'task_conn': task['airflow_conn'],
    'cmd': task['cmd']}
To get an impression how the whole generation process works, please have a look at the following pseudo code:
Loop through active dags of table *dag_task* (SQL: q_get_dags)
    Loop through tasks of DAG (SQL:q_get_tasks), pick template and values for each task
        Render each task template with task values and append the rendered code to the key *tasks* in *dag_data* dictionary
    Loop through all task dependencies of a DAG (SQL: q_get_seq) and append all dependencies to key *dependencies* of dictionary *dag_data*
    Render dag template with *dag_data*
    Write rendered DAG code as Python file to /dags folder
Usage
To create a new ETL pipeline you have to implement it’s metadata and then deploy it to the etl database. To generate the DAG files just execute the generator DAG, wait until Aiflow has parsed the dags folder (default: 60 sec) and you are done.
In this example the execution of the generator DAG will create a DAG with the name load_sale_star. Run load_sale_star to load the example data from stage database into the dhw database. A newly generated DAG gets its dag_id from the column dag.dag_id. The dag_id is also used as file name. The dag_id is the unique name, which appears in the Airflow webui.
Adjustments for existing DAGs and tasks are done by updating the metadata of the affected element. To persist the changes in Airflow run generator DAG again to recreate the DAG files.
Verdict
During the implementation, I recognized that the efforts to design meta tables and metadata was significant higher, while implementing the generator DAG was easier then expected. Okay, this is what you might expect of a metadata driven approach, but that creating the metadata took 80% of my time compared to 20% for the coding part was a little surprising. As the existing metadata can be used as a pattern for a further development, this should not be a problem, but as said in the disclaimer, it’s not proven in a real development process.
I hope you’ll have fun playing around with the code. If you have ideas, find bugs or have questions, feel free to open a pull request on Github or write me an email.
Thank you Sheena, Mischa, Phillip and Ölaf for reviewing!
